Dimmer Switch 2 Way Wiring: Complete UK Guide, Diagram Explanation and Troubleshooting Tips

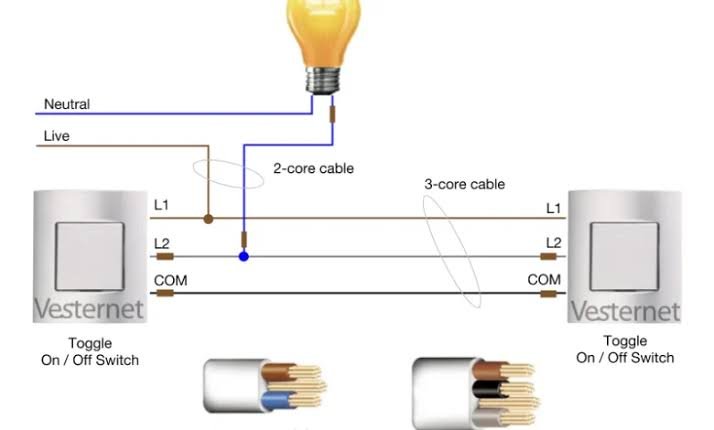
A Dimmer Switch 2 Way Wiring system allows a single light fitting to be controlled from two different locations while also providing the ability to adjust brightness. This type of setup is commonly used in UK homes for areas such as staircases, hallways, bedrooms, and larger living spaces where controlling lighting from multiple points improves convenience. Instead of only switching a light on or off, a dimmer gives homeowners control over the intensity of illumination, creating different lighting levels for different activities.
A standard two-way lighting circuit normally uses two switches to control one light. When a dimmer switch is introduced, one of those switches is replaced with a compatible dimmer while the second switch continues operating as a two-way control point. This allows users to adjust brightness from the dimmer location while still being able to switch the light on or off from the other side of the circuit.
Understanding the basic structure of this system is important before making any changes. A typical two-way dimmer arrangement includes terminals such as COM (Common), L1, and L2, which manage the switching path between controls. However, wiring layouts can vary depending on the age of the property, existing installation methods, and the type of dimmer being installed. Always check the manufacturer’s instructions and ensure the circuit is safely isolated before working on electrical components.
Modern dimmer switches are especially popular with LED lighting because they provide better control over energy use and room atmosphere. However, not every LED bulb works with every dimmer. Using a non-dimmable bulb or an incompatible dimmer can result in flickering, buzzing, reduced brightness range, or unreliable operation.
How Does a Two Way Dimmer Switch Circuit Work?
A two-way lighting circuit works by creating multiple switching paths between two control points. Unlike a normal switch that simply interrupts power to a light, a two-way arrangement allows either switch position to complete or break the circuit. This makes it possible to operate one light from two separate locations, such as switching a staircase light from the bottom and top floors.
When a dimmer switch is added to this circuit, its role changes from simply controlling power flow to adjusting the amount of energy delivered to the bulb. The dimmer regulates the output level, allowing the user to choose between full brightness and softer lighting. The second switch remains part of the two-way system, allowing the light to be controlled from another position.
The main terminals found on many two-way dimmers are COM, L1, and L2. The COM terminal is the common connection point, while L1 and L2 are used for the switching connections between the two control points. These terminals allow the switches to communicate with each other and determine whether the light remains powered or switched off.
For UK homes, it is also important to understand that wiring systems can differ between older and newer properties. Older installations may use different cable colours compared with modern standards, and previous modifications may not always follow current practices. Because of this, wires should always be identified carefully rather than relying only on colour assumptions.
Dimmer Switch 2 Way Wiring Diagram Explained
A clear wiring layout is one of the most important parts of understanding a Dimmer Switch 2 Way Wiring installation. In a typical setup, power enters the lighting circuit, passes through the switching arrangement, and reaches the light fitting. The dimmer controls brightness while the second switch provides additional control from another location.
The basic concept includes several key components: the incoming live supply, the dimmer switch, the second two-way switch, the light fitting, the neutral connection, and the earth safety connection. The dimmer is usually installed at one switching position, while the other switch remains a standard two-way switch designed to work alongside it.
The COM, L1, and L2 terminals are essential because they control the switching pathway. The exact connection method depends on the dimmer manufacturer and the existing wiring arrangement. Some modern dimmers may require additional connections compared with traditional switches, especially smart dimmers or LED-focused models.
A wiring diagram should always be treated as a guide rather than a universal instruction because electrical installations are not identical. Factors such as cable routing, existing switch position, and property age can change the arrangement. When there is uncertainty, checking the circuit with proper testing equipment or consulting a qualified electrician is the safest approach.
Tools and Preparation Before Installing a Two Way Dimmer Switch
Proper preparation makes a major difference when working with a Dimmer Switch 2 Way Wiring system. Before starting any electrical work, it is important to gather the correct tools and understand the existing setup. Common tools include a screwdriver set, voltage tester, wire labels, insulated tools, and protective equipment.
A voltage tester is particularly important because turning off a wall switch does not always guarantee that wires behind the plate are safe. The electrical supply should be isolated at the consumer unit or circuit breaker, and the circuit should be tested before touching any connections. Safety checks help prevent accidental contact with live electrical parts.
Before removing the existing switch, take a clear photograph of the current wiring arrangement and label wires where necessary. This can help during reinstallation, especially when replacing an older two-way switch with a dimmer. However, photographs should only support identification and should not replace proper testing or understanding of the circuit.
Choosing the correct dimmer is another important preparation step. Check that the dimmer supports two-way operation and is compatible with the lighting type being used. LED bulbs usually require LED-compatible dimmers, while older incandescent or halogen lighting may require different specifications.
Step-by-Step Guide to Installing a 2 Way Dimmer Switch
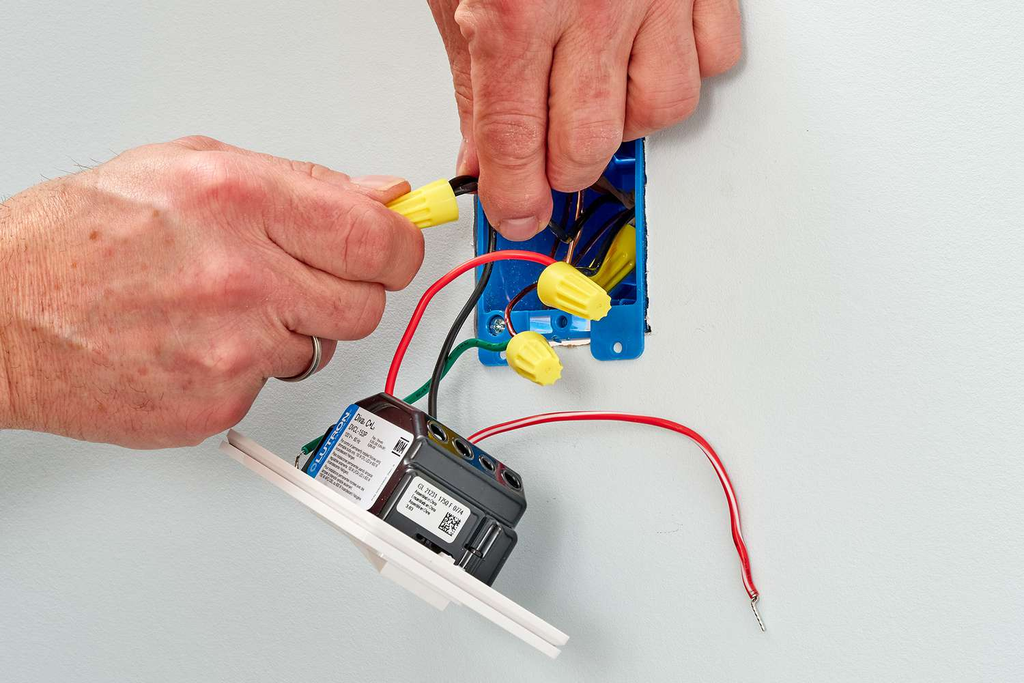
Replacing a standard two-way switch with a dimmer requires careful attention to the existing circuit arrangement. The first stage is always safety preparation. Switch off the power supply at the correct circuit breaker, verify that electricity is no longer present, and only then remove the existing switch plate.
Once the switch is accessible, identify the existing connections and compare them with the new dimmer’s instructions. Most dimmers will have labelled terminals, but manufacturers may arrange connections differently. The purpose of each connection should be understood before transferring wires from the old switch to the new one.
After the connections have been made according to the correct wiring instructions, ensure all terminals are secure and that no exposed conductor is visible outside the connection points. The dimmer should fit safely into the wall box without forcing or damaging cables. A loose connection can create reliability problems and may cause overheating.
After completing the installation, restore power and test the system carefully. Check that both switching locations operate correctly and that the dimmer adjusts brightness smoothly. If the light does not work correctly, avoid repeated testing under power and inspect the circuit after safely isolating the electricity again.
Choosing the Right Dimmer Switch for LED Lighting
LED lighting has changed the way homeowners approach dimmer installations. Unlike traditional incandescent bulbs, LED lamps require specific dimming technology because they operate using electronic components. Installing an incompatible dimmer can lead to problems such as flickering, buzzing, limited dimming range, or lights that fail to switch off completely.
When selecting a dimmer, check whether it is designed specifically for LED use. Many modern products are labelled as LED-compatible or universal dimmers. These are designed to manage the lower power requirements of LED bulbs while maintaining smoother brightness control.
Another factor to consider is the dimmer’s load capacity. A dimmer should not be overloaded with more lighting power than it is designed to handle. Checking the manufacturer’s specifications helps ensure reliable performance and prevents unnecessary strain on the electrical components.
Smart dimmers are also becoming increasingly popular in modern homes. These models can connect with mobile applications, smart assistants, or home automation systems, allowing users to control brightness remotely. They provide additional convenience but may require specific installation requirements compared with traditional dimmers.
Common Dimmer Switch 2 Way Wiring Problems and Solutions
One of the most common issues after installing a dimmer switch is flickering. This problem is often caused by using incompatible LED bulbs, incorrect dimmer selection, or loose connections. Replacing the bulb with a suitable dimmable LED model or upgrading the dimmer can often solve the problem.
Buzzing or humming sounds can also occur when the dimmer and bulb combination are not properly matched. While some electrical components may produce minor operating noise, noticeable buzzing can indicate compatibility issues or excessive load. Checking the product specifications is an important troubleshooting step.
Another common problem is when the light works from one switch but not the other. This may indicate an issue with the two-way switching arrangement, incorrect terminal connections, or a fault within the switch. Because electrical faults can be difficult to identify safely, professional assistance may be required if basic checks do not resolve the problem.
A dimmer switch becoming unusually hot should never be ignored. While some warmth during operation can be normal, excessive heat may indicate overloading, incorrect installation, or an unsuitable product. Addressing these issues quickly helps maintain electrical safety.
Traditional Switch vs Two Way Dimmer Switch
A traditional two-way switch provides simple control by allowing users to turn a light on or off from two locations. It is reliable, affordable, and suitable for areas where brightness adjustment is not required. However, it provides no control over lighting intensity.
A two-way dimmer switch offers additional flexibility by allowing users to adjust brightness levels according to their needs. This makes it useful for rooms where lighting requirements change throughout the day. Lower brightness can create a relaxing atmosphere, while higher brightness can support activities requiring stronger illumination.
The choice between a standard switch and a dimmer depends on the purpose of the room and the user’s preferences. For basic lighting control, a traditional switch may be sufficient. For improved comfort, energy management, and modern home design, a compatible dimmer can provide significant advantages.
Conclusion
A Dimmer Switch 2 Way Wiring system is a practical upgrade that combines the convenience of multiple switch locations with the flexibility of adjustable lighting. It allows homeowners to create comfortable environments while improving control over how lighting is used throughout the home.
Understanding how two-way circuits work, the purpose of COM, L1, and L2 terminals, LED compatibility, and common troubleshooting issues helps users make better decisions when upgrading their lighting systems. However, electrical work requires careful handling, and every installation should be approached with safety as the highest priority.
With the correct dimmer, suitable bulbs, and proper installation methods, a two-way dimmer setup can provide reliable performance and improve the overall lighting experience in modern homes.
FAQs About Dimmer Switch 2 Way Wiring
Can I install a dimmer switch on a two-way lighting circuit?
Yes, a compatible two-way dimmer can replace one switch in a two-way circuit while the other switch continues controlling the same light.
What do COM, L1, and L2 mean on a dimmer switch?
COM is the common terminal, while L1 and L2 are the switching terminals used to connect the two-way control arrangement.
Why does my LED light flicker with a dimmer switch?
Flickering is usually caused by incompatible LED bulbs, an unsuitable dimmer, incorrect load requirements, or wiring issues.
Can I use any LED bulb with a dimmer switch?
No, the LED bulb must be specifically designed as dimmable and compatible with the installed dimmer.
Do I need an electrician to install a two-way dimmer switch?
If you are unsure about electrical wiring or the existing circuit, using a qualified electrician is the safest option.
You May Also Read: 4K Films Free Download