Lighting is one of the most essential aspects of home design, influencing both functionality and ambiance. A Dimmer Switch 2 Way Wiring allows you to control the brightness of your lights, creating a customized atmosphere for any room. Unlike a traditional on/off switch that delivers full power to the light fixture, a dimmer regulates the voltage supplied to the bulb, offering a spectrum of brightness levels. This simple feature can transform your living room into a cozy relaxation zone or provide optimal brightness for reading and work.
Dimmer Switch 2 Way Wiring setup takes this convenience even further. It allows you to control a single light source from two different locations — for example, at both ends of a hallway or the top and bottom of a staircase. This setup is ideal for larger spaces where accessing one switch point is not always convenient.
Beyond convenience, installing a Dimmer Switch 2 Way Wiring offers numerous benefits. It improves energy efficiency, extends bulb lifespan, and reduces electricity bills. Plus, modern dimmers are compatible with LEDs and smart home systems, making them a practical addition to any contemporary household.
Understanding the Basics of Dimmer Switch 2 Way Wiring
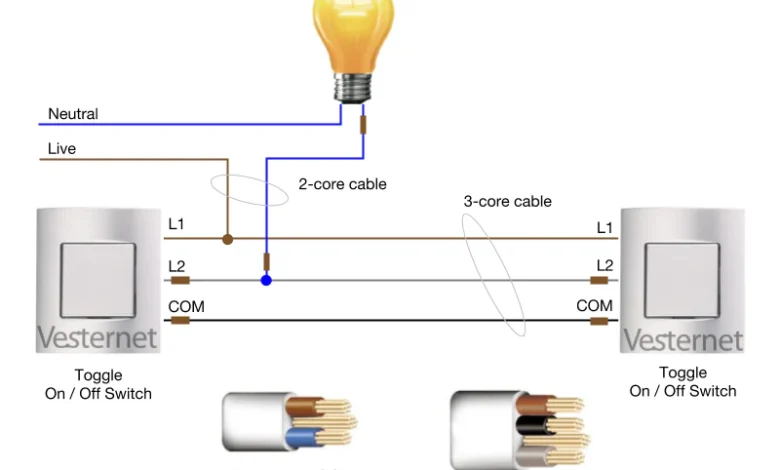
A 2-way wiring system is designed so that two switches can control the same light. This is achieved through an electrical configuration that allows current to travel between both switches, depending on which one is toggled. The key components of this setup are the Common (COM) terminal, L1, and L2 terminals. Each plays a unique role in directing the electrical flow that controls the light.
When you introduce a Dimmer Switch 2 Way Wiring into this setup, it replaces one of the two standard switches. The dimmer doesn’t just act as an on/off controller — it modulates the voltage to the bulb, allowing gradual brightness adjustments. For example, turning the dimmer knob or slider changes how much current passes through, altering light intensity.
Understanding how a dimmer integrates into a 2-way circuit is crucial before installation. In most homes, the dimmer is installed at one end of the circuit, while the other remains a regular switch. This ensures both switches can still control the light, but dimming functionality comes from the dimmer side.
Tools and Materials Required for Installation
Before beginning, it’s important to gather all necessary tools and materials to ensure a smooth installation process. You’ll need a screwdriver, voltage tester, wire stripper, and electrical tape. These tools help you safely open the switch plate, handle wiring, and secure connections properly.
For materials, you’ll require a 2-way dimmer switch, standard switch, appropriate electrical cables, and a junction box. Always check that the dimmer you’ve chosen is compatible with your light bulbs — LED dimmers, for instance, are specifically designed to handle low-wattage lighting efficiently.
Safety is non-negotiable in electrical work. Equip yourself with insulated gloves, safety goggles, and ensure that the power is switched off at the circuit breaker before touching any wiring. Taking precautions upfront prevents accidents and ensures a reliable installation.
Step-by-Step Guide to Wiring a 2-Way Dimmer Switch
Preparation and Safety Checks
Start by turning off the power supply at the main breaker. Verify the power is off using a voltage tester. Next, remove the faceplate of your existing switch and gently pull it out to expose the wiring behind it.
Understanding the Wiring Diagram
Each dimmer and 2-way switch has three main terminals: COM, L1, and L2. The COM is typically used to connect the live wire, while L1 and L2 handle the traveler wires between the two switches. Carefully label or photograph existing wire positions before disconnecting them — this makes reconnecting easier and more accurate.
Connecting the Dimmer Switch
Connect the live wire to the COM terminal on the dimmer, and the traveler wires to L1 and L2. Tighten the screws securely and ensure no bare copper is exposed. Attach the dimmer back into the junction box and fix the faceplate.
Testing the Circuit
Once wiring is complete, restore power and test your new setup. Check that both switches can turn the light on and off, and that the dimmer correctly adjusts brightness. If the light flickers or doesn’t dim smoothly, double-check connections or bulb compatibility.
Safety Tips and Common Mistakes to Avoid

Working with electrical circuits can be dangerous if proper precautions aren’t followed. Always cut power at the breaker, and never rely solely on switching off the light switch. Using a voltage tester ensures you’re working on a dead circuit.
A common mistake is confusing the COM terminal with L1 or L2. Incorrect wiring can cause the light to malfunction or fail entirely. Another frequent issue is using an incompatible dimmer with LED bulbs, which can result in flickering or buzzing noises. Always verify that your dimmer supports your specific bulb type.
If you notice persistent issues, overheating, or buzzing, it’s best to consult a licensed electrician. Professional guidance ensures both safety and compliance with electrical standards.
Types of Dimmer Switches for 2-Way Wiring
There are several types of dimmer switches suited for 2-way circuits. The rotary Dimmer Switch 2 Way Wiring is the most traditional, featuring a simple turning knob to adjust brightness. These are reliable, affordable, and easy to install.
Modern homes often opt for touch or smart dimmers. Touch dimmers respond to finger swipes or taps, providing seamless control. Smart dimmers, on the other hand, integrate with Wi-Fi or Bluetooth, enabling you to adjust lighting through mobile apps or voice assistants like Alexa or Google Home.
When selecting a dimmer, consider bulb compatibility. LED-compatible dimmers prevent flickering and enhance efficiency, while universal dimmers support a wide range of bulbs, including incandescent and halogen.
Maintenance and Troubleshooting
Maintaining your Dimmer Switch 2 Way Wiring setup ensures long-term reliability. Regularly inspect the faceplate and wiring connections for dust, loosened screws, or signs of overheating.
Common issues include flickering lights, which often stem from incompatible bulbs or loose wiring. Buzzing or humming sounds typically indicate that the dimmer is overloaded or the bulb wattage exceeds the dimmer’s capacity. Replacing bulbs or upgrading the dimmer can usually fix these issues.
If your dimmer fails to respond, check for tripped breakers or burned-out bulbs before assuming a wiring fault. Keeping the system well-maintained not only enhances performance but also ensures electrical safety.
Energy Efficiency and Benefits of Using Dimmer Switches
Installing a Dimmer Switch 2 Way Wiring is not just about aesthetics — it’s a smart energy-saving decision. By lowering light intensity, dimmers reduce power consumption, leading to lower electricity bills. Even a slight dimming of lights can extend the lifespan of your bulbs significantly.
From an environmental perspective, using dimmers contributes to sustainability by decreasing energy waste. They also allow greater flexibility in ambiance creation, letting you transition smoothly from bright workspace lighting to a cozy evening glow.
In modern smart homes, dimmer switches have become integral to energy management systems, helping homeowners reduce carbon footprints while maintaining style and comfort.
Conclusion
Installing a Dimmer Switch 2 Way Wiring setup enhances both the functionality and aesthetic appeal of your home. Whether you want soft ambient lighting for relaxation or bright illumination for daily tasks, a dimmer provides effortless control.
However, safety remains paramount. Always follow wiring diagrams, use compatible components, and when in doubt, seek professional help. With the right tools and precautions, Dimmer Switch 2 Way Wiring is one of the simplest yet most effective home upgrades you can make.
FAQs About Dimmer Switch 2 Way Wiring
Can any light switch be replaced with a dimmer?
No. You need to ensure your dimmer is compatible with both the circuit type (1-way or 2-way) and the light bulb type (LED, halogen, etc.).
Can I install dimmers on both ends of a 2-way circuit?
Usually, only one dimmer is used, while the other end remains a standard switch. Dual dimmer setups require special compatibility.
Why does my light flicker when dimmed?
This often occurs due to incompatible LED bulbs or poor wiring connections.
Do dimmers really save energy?
Yes. Dimmers reduce the power flowing to the bulb, cutting energy usage and extending bulb life.
Is it safe to install a Dimmer Switch 2 Way Wiring myself?
If you have basic electrical knowledge and follow safety guidelines, yes. Otherwise, it’s best to hire a professional electrician.
You May Also Read: 4K Films Free Download